Options
Options change how often the integration asks your battery for data, how it handles a slow or unreliable connection, and the default power for automations. The defaults suit most homes. Change them when the battery often shows as unavailable, when you want faster updates, or when your automations need a different charge or discharge power.
Open Settings > Devices & services > Marstek > your battery > Configure.
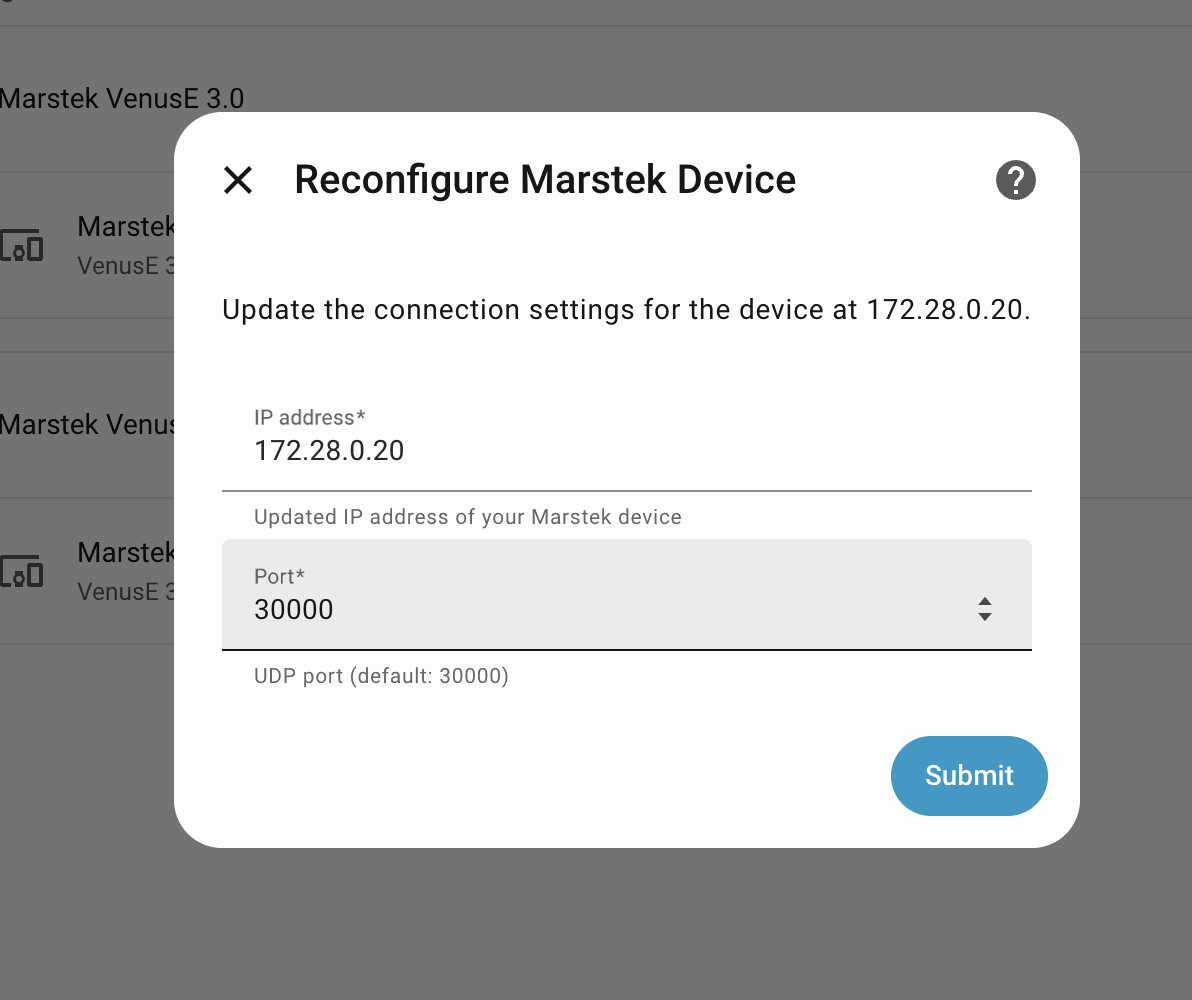
Polling Intervals
The battery never reports changes by itself, so the integration asks it for new values at a regular interval (this is called polling). Asking too often can overload the battery, so the questions are split into three groups:
- Fast polling interval (default 30 s, range 5–300 s): operating mode, battery status and meter power. These change quickly.
- Medium polling interval (default 60 s, range 5 s–24 h): solar panel data, on Venus A and Venus D.
- Slow polling interval (default 300 s, range 5 s–24 h): Wi-Fi signal and battery details such as temperature. These requests are sent only while you have enabled a sensor that needs them.
A shorter interval gives fresher values but sends more requests to the battery. Fast, medium and slow can each be set as low as 5 seconds. That is room in the form to choose a shorter interval. It does not promise a new value every 5 seconds, and it is not a claim that 5 seconds has been shown to be safe on a real battery or that it changes Ethernet behaviour.
Home Assistant runs one poll at a time. The fast interval is how long it waits after that poll finishes before it starts the next (fetching data). Medium and slow do not start polls of their own. They decide whether solar, Wi-Fi and battery-detail requests are included in the poll that is already running. The gap between those requests stays on Delay between requests (default 5 s) unless parallel API requests is on. A poll can take longer than 5 seconds. The next one starts only after that poll has finished and the fast interval has passed again, so the polls do not overlap.
Network Settings
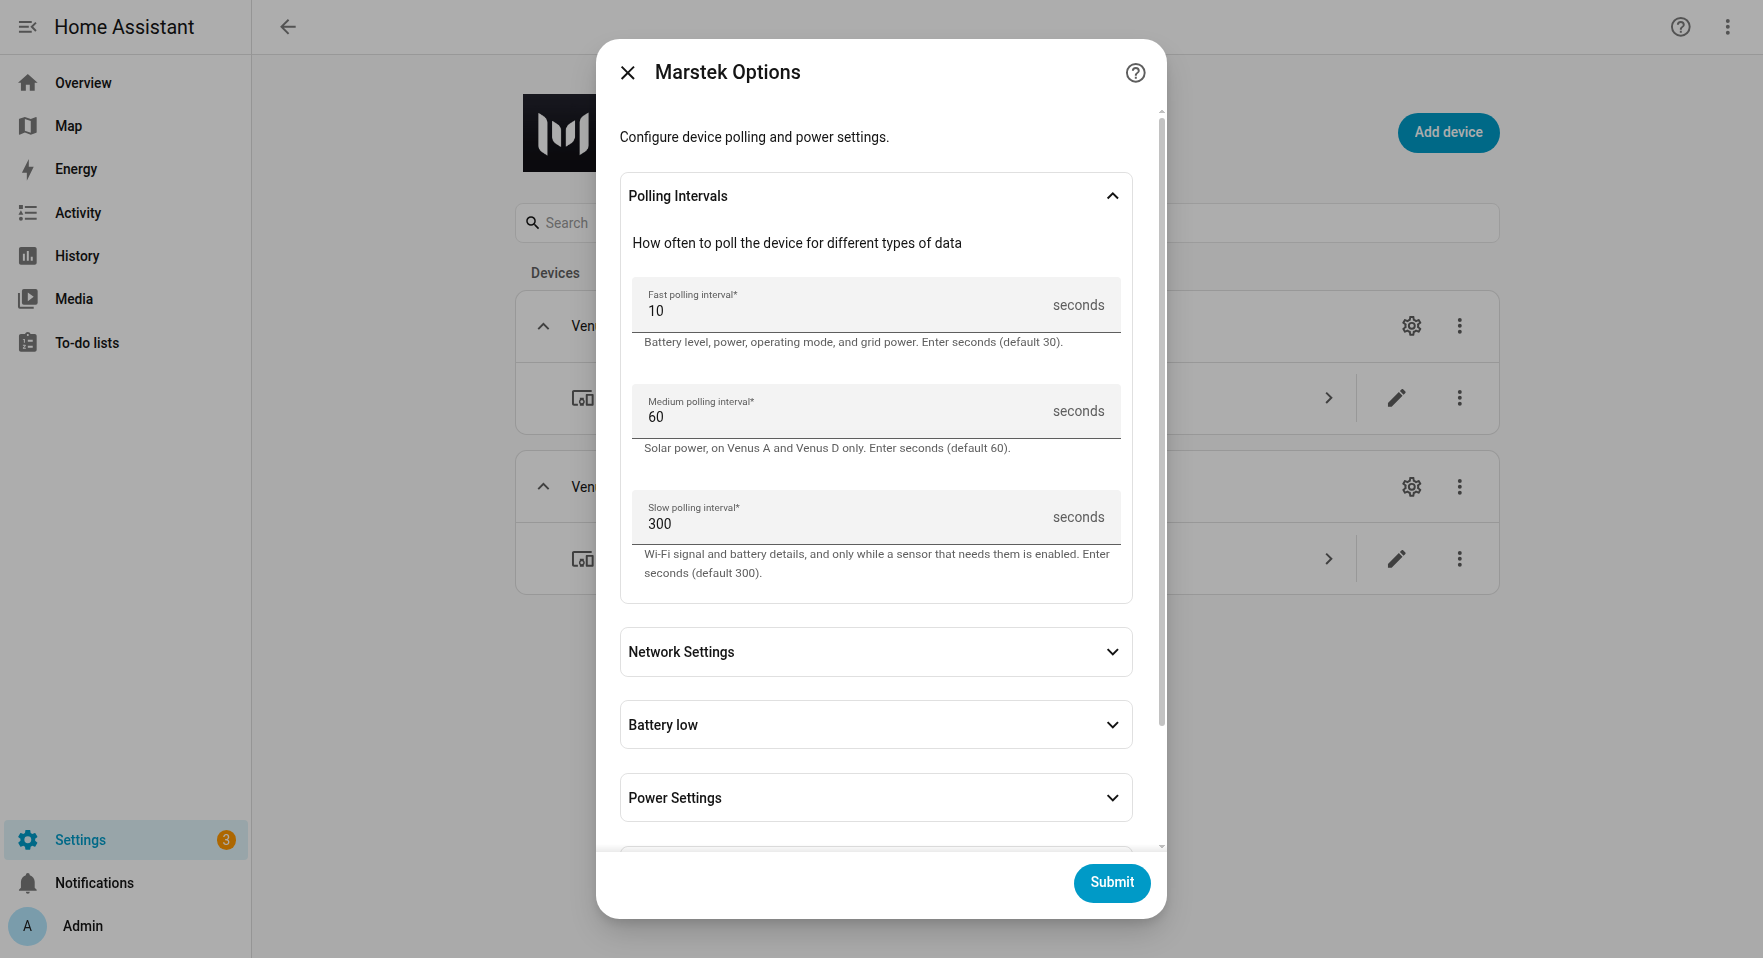
These settings control how fast requests are sent and how long the integration waits before it gives up. Marstek batteries can stop answering when they get many requests at once, so the integration spaces them out.
- Parallel API requests (advanced, default off)
- Delay between requests (default 5 s, range 1–30 s)
- Request timeout (default 10 s, range 5–60 s)
- Failures before unavailable (default 3, range 1–10)
If your battery often shows as unavailable, raise Delay between requests or Request timeout first.
Parallel API requests (advanced)
When you turn this on, the integration sends all its status requests at once instead of one after the other with a pause in between.
- Values can update faster on a stable network.
- Requests can time out or fail more often, especially on Wi-Fi.
- A wired network connection is recommended if you turn this on. Firmware 150 fixed the Open API over Ethernet. Over Wi-Fi, requests still go through the battery's Wi-Fi module and can time out more often (based on limited local testing).
- The integration ignores this setting on Venus C, and on firmware known to reset the Open API. See the details below for the exact list.
Technical details
Ignored on Venus C and other HMG-50 firmware (the Open API shares a Wi-Fi channel with the battery's meter link there), and on firmware the integration treats as reset-prone (Venus A, D and E 3.0 below 150, including Open API ver 1476 / app 147.6; Venus E mini below 150; HMG-50 below 156; a missing or unknown ver). Venus E 3.0 150 is the vendor Local API Ethernet fix. Reset-prone devices also serialize unicast requests and skip Bat.GetStatus.
The Wi-Fi path goes through the FC41D module.
Repeated requests
Wi-Fi sometimes loses a message. To make up for that, the integration sends a read request again if the battery has not answered yet. This happens whether parallel requests are on or off, but not on Venus C or on firmware known to reset the Open API.
The copies go out at 0.5 s, 2.5 s and 5 s, as long as that stays within the Request timeout. A reply stops the copies, so a battery that answers within 0.5 s never gets one.
The Delay between requests field remains configurable, but it is ignored while parallel API requests is enabled.
Failures before unavailable sets how many failed updates in a row it takes before the battery's entities show as unavailable. Until then, the integration keeps showing the last known values, so one missed answer doesn't make your dashboard flicker.
Power Settings
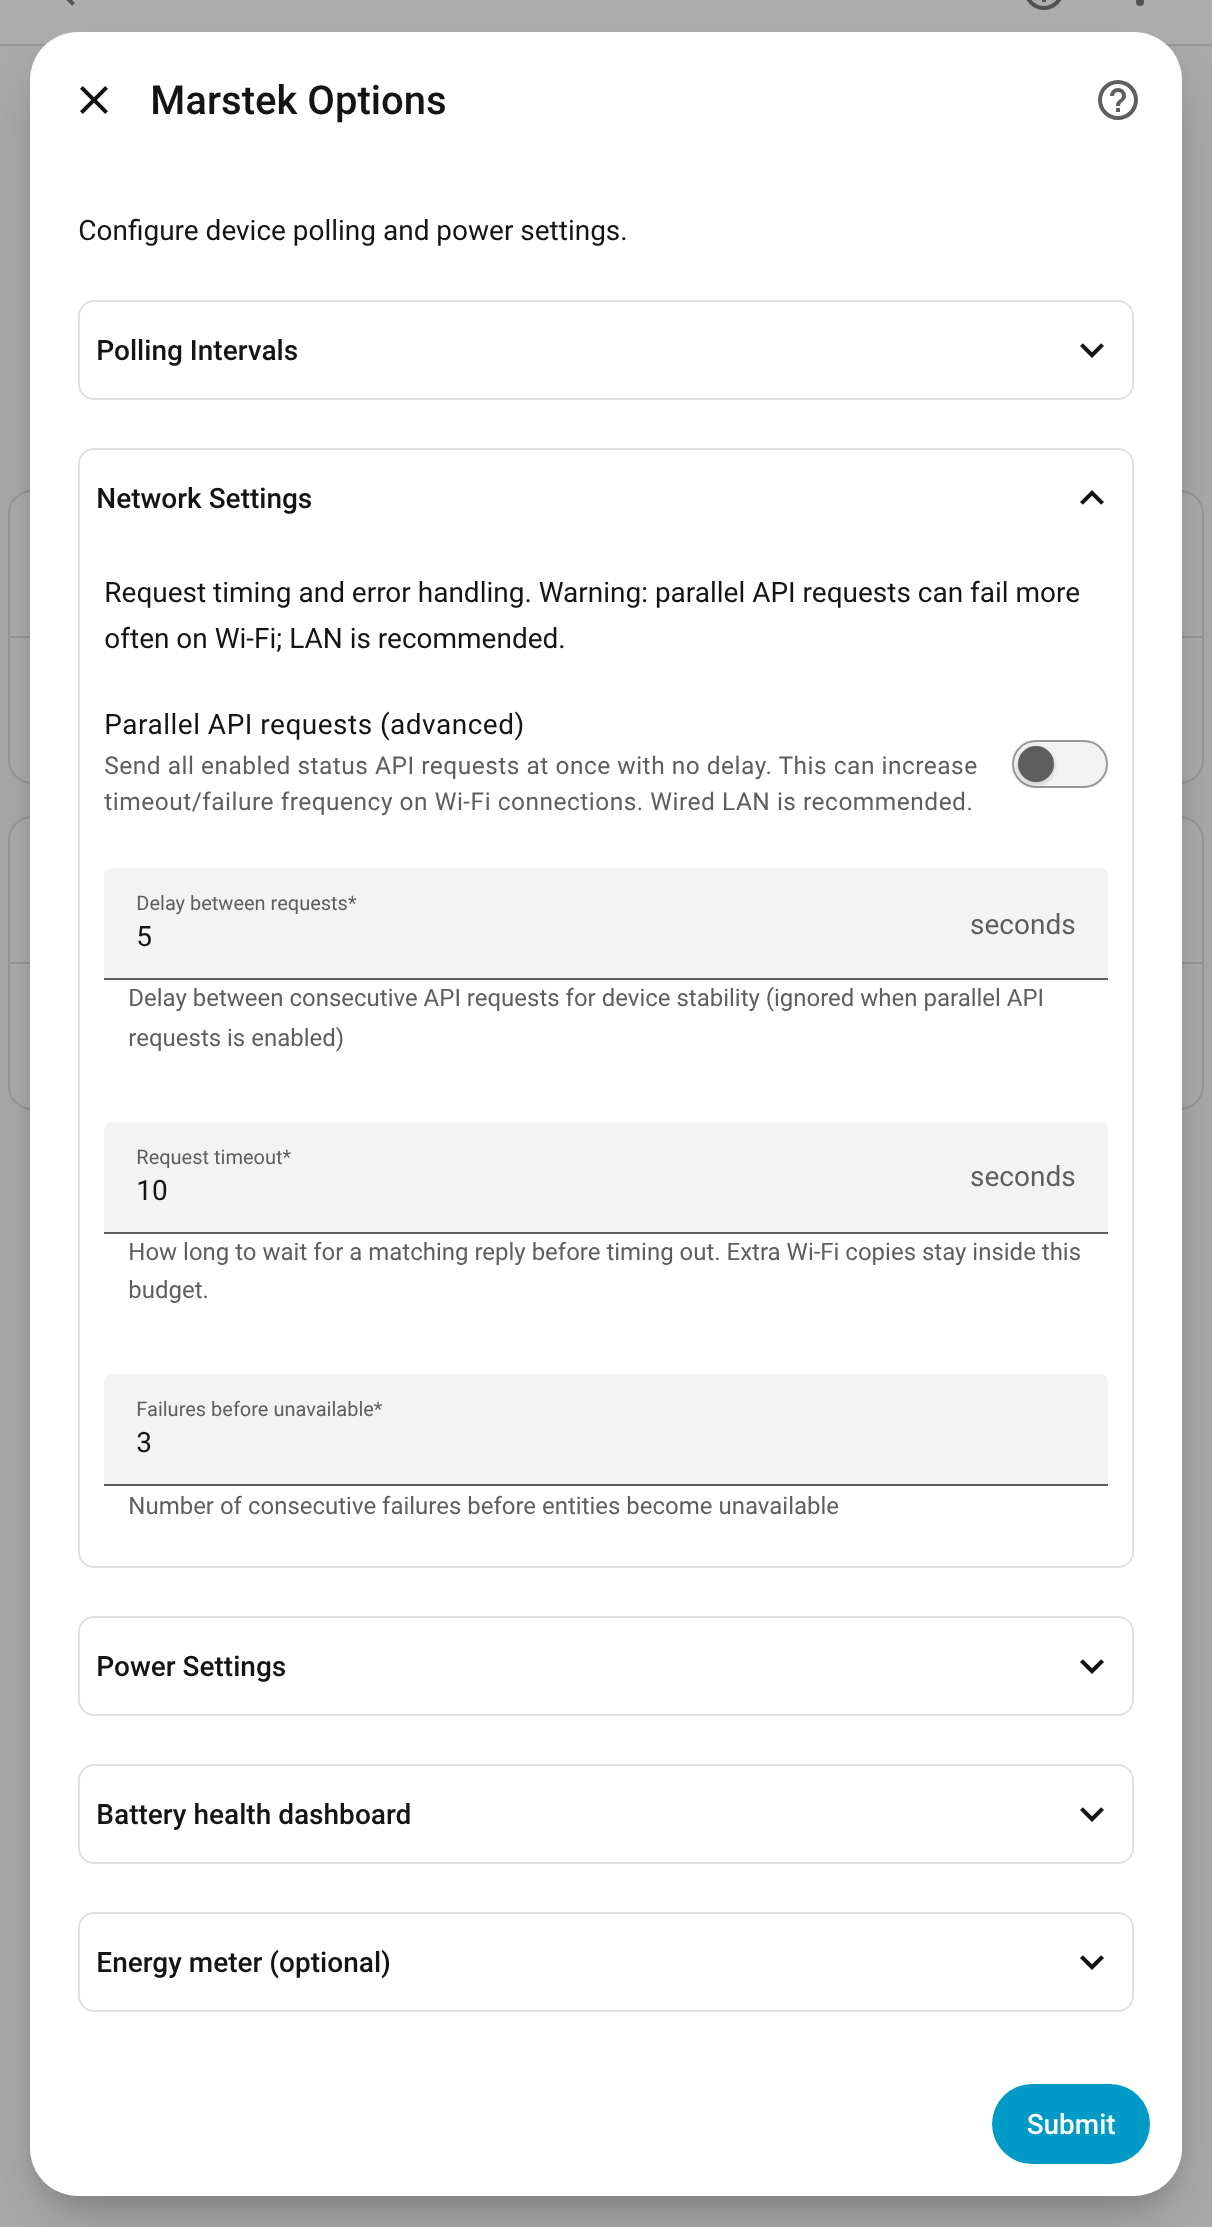
These settings set the default power for the Charge battery and Discharge battery automation actions, protect batteries plugged into a wall socket, and change how off-grid power is shown:
- Default charge power (W, range -5000–0, default -1300): power used by the Charge battery device action when you don't enter one. Charging is written as a negative number.
- Default discharge power (W, range 0–5000, default 800): power used by the Discharge battery device action when you don't enter one.
- Enforce 800 W discharge limit: caps the discharge power that services and actions may request. Keep it on if the battery is plugged into a wall socket.
- Clamp negative off-grid power to 0 W (default off): the Off-grid power sensor reports 0 W instead of the small negative readings some firmware reports while charging with nothing plugged into the backup (EPS) socket. Battery power is still calculated from the real, signed measurement.
The 800 W limit defaults to on for Venus C, Venus D, Venus E and Venus E mini, and off for Venus A. While it is on, a discharge request above 800 W is refused. With it off, the cap is the highest power that model can handle:
| Family | Maximum absolute power |
|---|---|
| Venus A | 1500 W |
| Venus D | 2200 W |
| Venus C, Venus E, Venus E mini | 2500 W |
| Unknown family | 5000 W |
Charging is always checked against the same per-model maximum (as a negative value). The 800 W socket limit only caps discharge.
Battery low
Battery low is the sensor Home Assistant uses for Battery is low and Battery became low.
- Follow the discharge cutoff (default on): the sensor turns on 5 percentage points above the floor where discharging stops. That floor is 100% minus the Depth of discharge number (a depth of discharge of 88 means the floor is 12%, so the sensor turns on at 17%). Devices without that number use 15%.
- Fixed level (5–80%, default 15%): used only when follow-cutoff is off.
Once the sensor is on, it stays on until the state of charge rises another 5 percentage points. Charging is not configured here. It follows battery power and turns on at −50 W or below.
Battery health dashboard
Show Battery health in the sidebar adds a Battery health page (Dutch: Batterijgezondheid) that compares every Marstek battery. The cards are available from Add card whether this is on or off. The option starts off. Turning it off again hides the sidebar entry and leaves the dashboard in place. Reload the browser if the sidebar entry does not appear after you submit.
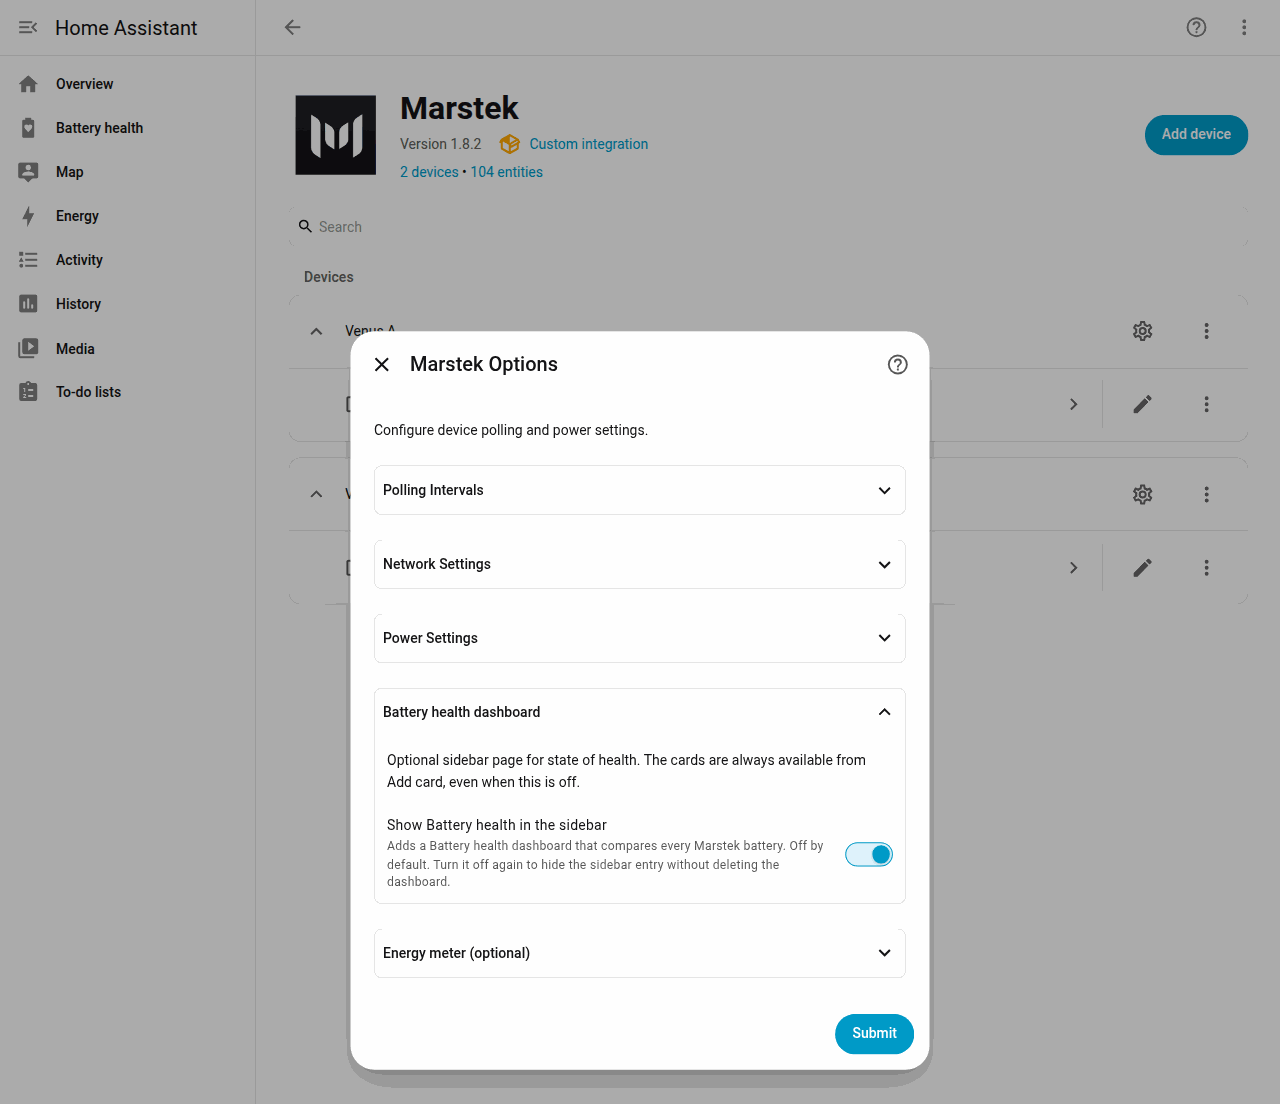
What the page shows, and how to add the same cards to a dashboard you already have, is the visual tour.
Energy meter (optional)
Link a smart plug or meter that sits only between this battery and the mains (a HomeWizard Energy Socket, a Shelly plug, or any meter with total energy sensors). The plug then measures how much energy the battery loses on the way in and out, and how much it uses while idle. The cards also show the plug's live power. Leave both fields empty to use only the battery's own readings.
- Energy into the battery: a total energy sensor that counts what the plug delivers to the battery. On a HomeWizard socket, Energy import.
- Energy out of the battery: a total energy sensor that counts what the battery sends back. On a HomeWizard socket, Energy export. Home Assistant creates that sensor disabled until you enable it on the socket's device page.
Fill both or neither, and pick two different sensors. The screenshot uses a lab meter named Mock energy plug. On your system the entities are named after your plug.
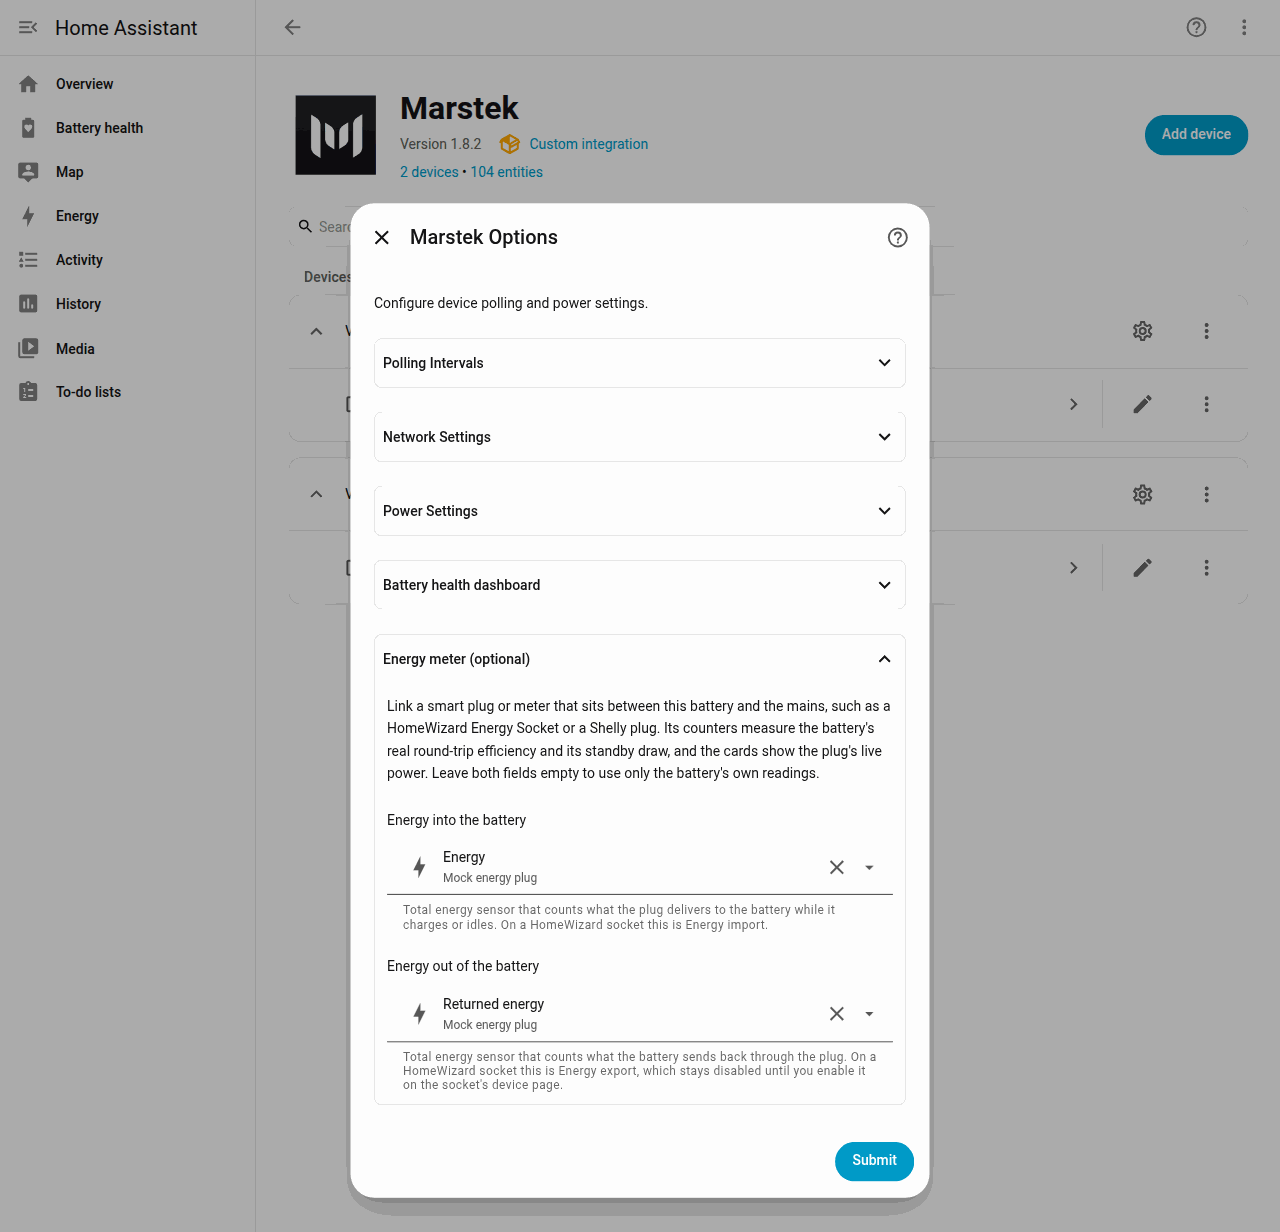
How to link the plug, step by step, is Link a smart plug. How the numbers are calculated is Energy meter (optional) in the under-the-hood half of that page.
Reconfigure
To change a battery's IP address or port, open Settings > Devices & services > Marstek, select the three-dot menu next to the battery, and choose Reconfigure.