Dashboard cards
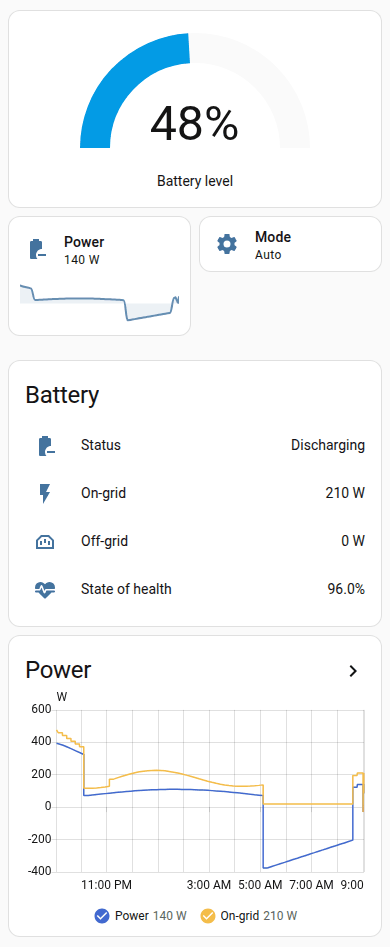
State of charge, power, solar, and operating mode are ordinary Home Assistant sensors. You can put them on any dashboard with the built-in cards. This page is a copy-paste layout for a live view, plus the same cards added in the visual editor.
The Battery health cards are a different view. They show usable capacity and an estimated state of health. They do not replace the live cards below.
Find your entity ids
Every example uses <battery> as a stand-in for the start of the entity id. Home Assistant builds that from the device name.
| Device name Home Assistant uses | Replace <battery> with |
|---|---|
| Venus E (3.0) | venus_e_3_0 |
| Venus A | venus_a |
| Venus D | venus_d |
A second battery with the same name gets _2 on the end of the prefix (venus_a_2). If you renamed the device, the prefix follows the new name.
To copy yours:
- Go to Settings > Devices & services > Marstek and open the battery.
- Select Battery level.
- Read the entity id, for example
sensor.venus_e_3_0_battery_level. - The prefix is the part between
sensor.and_battery_level.
Developer tools > States, filtered on battery_level, shows the same id.
The examples use the English names. Home Assistant creates the id from the name in the language you were using when the battery was added, and it does not rename the id if you switch language later. On a Dutch Home Assistant, Battery level was created as Batterijniveau, so the id ends in _batterijniveau instead of _battery_level. If a card says the entity is missing, copy the id from the device page.
A rename or an area change can give one entity a different prefix from the others. The single <battery> placeholder fits when Battery level, Battery power, and Operating mode still share it. When they do not, paste each entity id on its own.
The id you paste into a card is not the unique id. The unique id is the battery's BLE MAC plus an internal key, such as battery_soc for Battery level, and it stays put when you rename the entity. Leave it alone. The table lists both, so a diagnostics download is easy to match to a card.
| What you see (English) | Paste this | Unique id ends with |
|---|---|---|
| Battery level | sensor.<battery>_battery_level | battery_soc |
| Battery power | sensor.<battery>_battery_power | battery_power |
| Battery status | sensor.<battery>_battery_status | battery_status |
| Operating mode | select.<battery>_operating_mode | operating_mode |
| On-grid power | sensor.<battery>_on_grid_power | ongrid_power |
| Off-grid power | sensor.<battery>_off_grid_power | offgrid_power |
| PV power | sensor.<battery>_pv_power | pv_power |
| PV1 power | sensor.<battery>_pv1_power | pv1_power |
| Battery state of health | sensor.<battery>_battery_state_of_health | battery_state_of_health |
| Battery temperature | sensor.<battery>_battery_temperature | bat_temp |
| WiFi signal strength | sensor.<battery>_wifi_signal_strength | wifi_rssi |
PV power and PV1 power exist on Venus A and Venus D only. Positive Battery power is discharging. Negative Battery power is charging.
What the local API does not send
Battery state of health is an estimate from long charge and discharge runs. It stays unknown until a few of those runs are finished. The local API does not send a state of health, a cycle count, or cell voltages, and it has only one temperature.
The Energy tab on the Battery health card shows equivalent full cycles: energy the battery has delivered, divided by its nameplate. That is not a cycle counter from the battery. Cell-by-cell screens in other Marstek projects come from Modbus, which is a different connection.
Build it with the visual editor
No YAML is required. On a dashboard, choose Edit dashboard, then Add card.
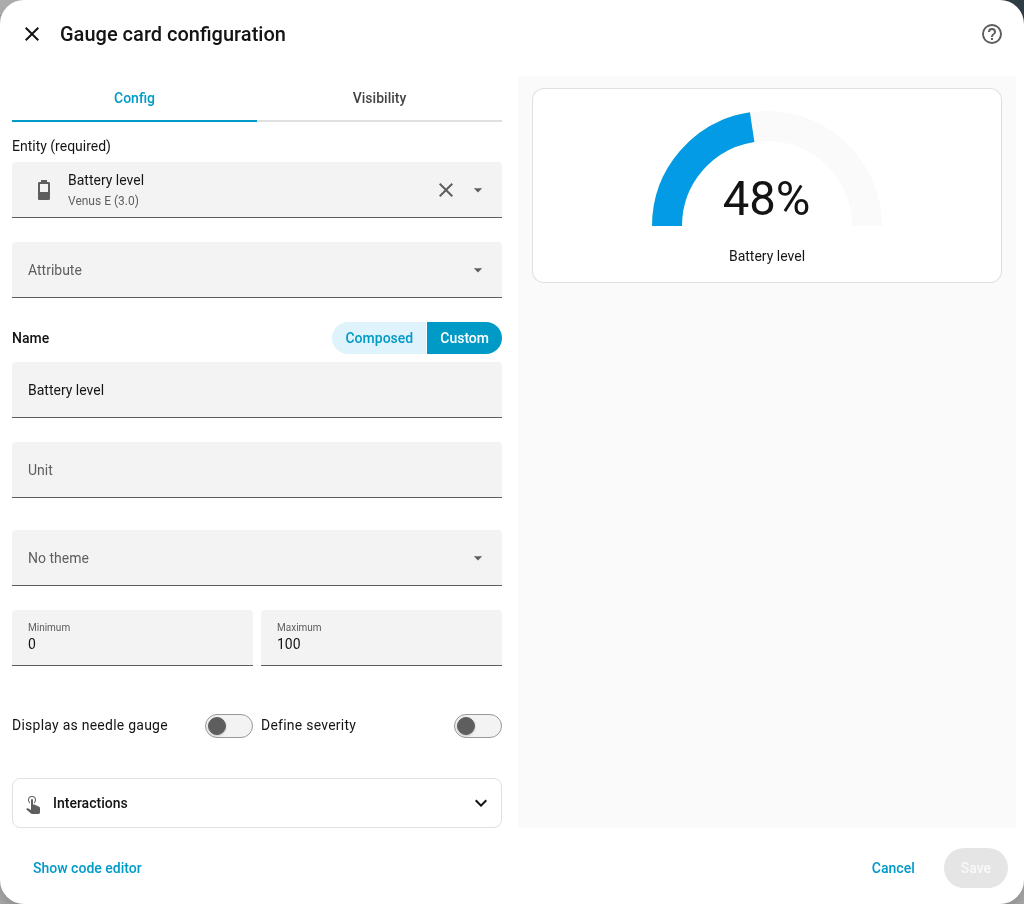
- Search for Gauge. Choose Battery level. Set the minimum to
0and the maximum to100. - Add a Tile. Choose Battery power. Open Features and add Trend graph.
- Add a Tile. Choose Operating mode. Selecting the card opens the mode list.
- On Venus A or Venus D, add another Tile and choose PV power. Skip this on Venus E, Venus C, and Venus E mini. Those models have no solar entities, and the card would stay empty.
- Add an Entities card. Add Battery status, On-grid power, Off-grid power, and Battery state of health.
- Add a History graph. Add Battery power, and PV power when the battery has solar. Set Hours to show to
12. - Add a card, search for
Marstek, and pick Marstek battery health. Choose the battery. The editor can also set a title and which tab opens first. Details are in Battery health.
The name fields in the examples are optional. A short name keeps the label readable on a phone. Without one, every card repeats the device name, such as Venus E (3.0) Battery level, and that gets cut off. Leave name out when you want the full entity name in your Home Assistant language. A name you type stays in that language.
Temperature and Wi-Fi are not in the steps above because those sensors start disabled. Turn them on first, then add them to the entities card. See Temperature and Wi-Fi.
A sections view stacks cards into one column on a phone. Add the cards to one section and stop there if that layout is enough.
Venus E layout
Venus E has no PV sensors. This stack is one card: a gauge beside battery power, then mode beside status, then the detail list and 12 hours of power history. Two columns stay readable on a phone. A third column gets cramped, so this layout stops at two.
Paste it from the dashboard menu under Raw configuration editor, or add the same cards one by one with the visual editor.
type: vertical-stack
cards:
  - type: grid
    columns: 2
    square: false
    cards:
      - type: gauge
        entity: sensor.<battery>_battery_level
        name: Battery level
        min: 0
        max: 100
      - type: tile
        entity: sensor.<battery>_battery_power
        name: Power
        features:
          - type: trend-graph
            hours_to_show: 12
  - type: grid
    columns: 2
    square: false
    cards:
      - type: tile
        entity: select.<battery>_operating_mode
        name: Mode
      - type: tile
        entity: sensor.<battery>_battery_status
        name: Status
  - type: entities
    title: Battery
    entities:
      - entity: sensor.<battery>_on_grid_power
        name: On-grid
      - entity: sensor.<battery>_off_grid_power
        name: Off-grid
      - entity: sensor.<battery>_battery_state_of_health
        name: State of health
      # Enable these on the device page first, then uncomment.
      # - entity: sensor.<battery>_battery_temperature
      # - entity: sensor.<battery>_wifi_signal_strength
  - type: history-graph
    title: Power
    hours_to_show: 12
    entities:
      - entity: sensor.<battery>_battery_power
        name: Power
      - entity: sensor.<battery>_on_grid_power
        name: On-grid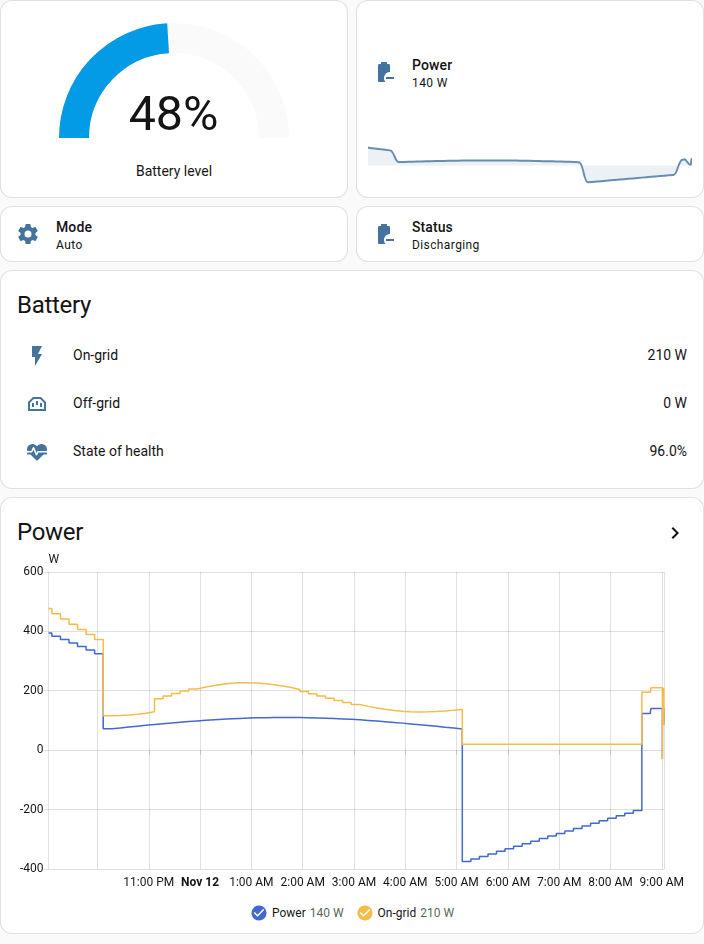
State of health on the list is the estimate. A battery that has not finished a long charge run and a long discharge run stays Unknown. The picture shows a pack that already has an estimate.
The gauge, tile, entities, and history cards are the built-in ones: gauge, tile, entities, and history graph.
Venus A and Venus D layout
Use the same stack, and put PV power in the second row instead of Battery status. Battery status stays in the entities list. PV1 power is there when you want the first solar input on its own. Venus D can show PV2, PV3, and PV4 the same way (sensor.<battery>_pv2_power, and so on). The full list is in Entities.
type: vertical-stack
cards:
  - type: grid
    columns: 2
    square: false
    cards:
      - type: gauge
        entity: sensor.<battery>_battery_level
        name: Battery level
        min: 0
        max: 100
      - type: tile
        entity: sensor.<battery>_battery_power
        name: Power
        features:
          - type: trend-graph
            hours_to_show: 12
  - type: grid
    columns: 2
    square: false
    cards:
      - type: tile
        entity: sensor.<battery>_pv_power
        name: PV
      - type: tile
        entity: select.<battery>_operating_mode
        name: Mode
  - type: entities
    title: Battery
    entities:
      - entity: sensor.<battery>_battery_status
        name: Status
      - entity: sensor.<battery>_pv1_power
        name: PV1
      - entity: sensor.<battery>_on_grid_power
        name: On-grid
      - entity: sensor.<battery>_off_grid_power
        name: Off-grid
      - entity: sensor.<battery>_battery_state_of_health
        name: State of health
      # Enable these on the device page first, then uncomment.
      # - entity: sensor.<battery>_battery_temperature
      # - entity: sensor.<battery>_wifi_signal_strength
  - type: history-graph
    title: Power
    hours_to_show: 12
    entities:
      - entity: sensor.<battery>_battery_power
        name: Power
      - entity: sensor.<battery>_pv_power
        name: PV
      - entity: sensor.<battery>_on_grid_power
        name: On-grid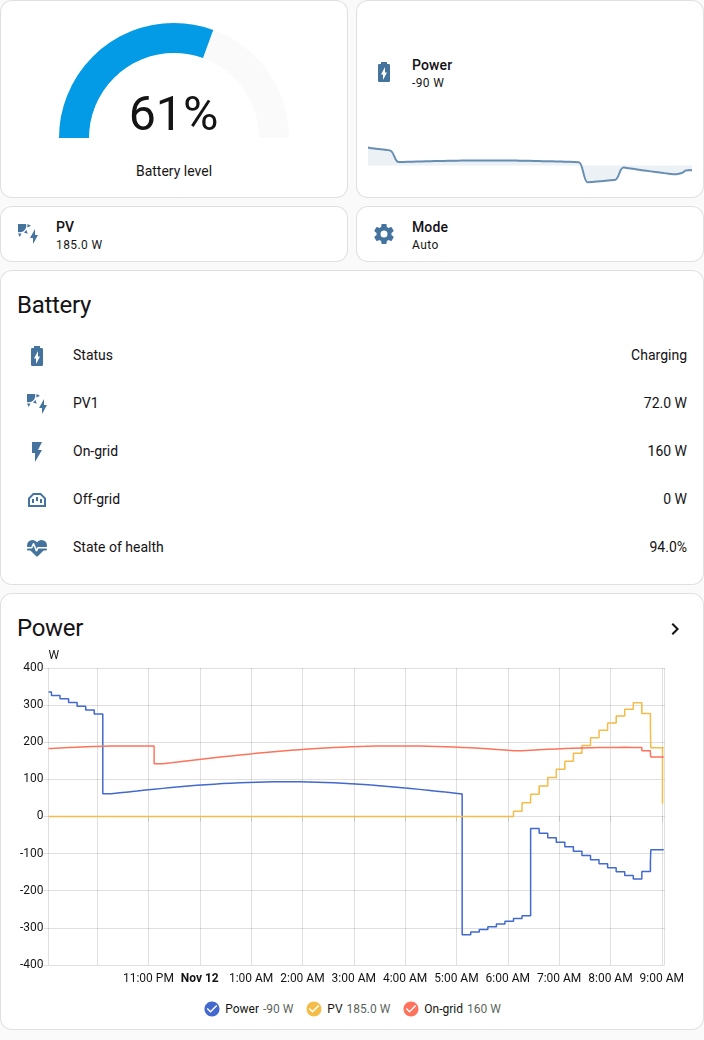
Temperature and Wi-Fi
Battery temperature and the Wi-Fi sensors are diagnostic and start disabled. A card that points at one of them shows a missing entity until you enable it.
- Open the battery's device page.
- Select Battery temperature or WiFi signal strength. Disabled entities are listed on that page.
- Select the gear icon, switch Enabled on, and select Update.
Enabling Battery temperature, Battery remaining capacity, Battery rated capacity, Charge permission, or Discharge permission makes Home Assistant ask the battery for battery details on the slow poll, every 5 minutes by default. Enabling any Wi-Fi sensor (signal, IP address, gateway, subnet mask, or DNS) starts the Wi-Fi request on that same slow poll. While every one of those entities is off, the integration does not send the request. The interval is Configure > Polling Intervals > Slow. See Options and Entities.
On Venus A, D, and E 3.0 below firmware 150, the temperature entities are not created. That request has been linked to the battery resetting itself. Firmware 150 and newer, including a Venus A on 151, can enable them. After a firmware update they come back, still disabled.
Energy dashboard
Lifetime energy belongs on Home Assistant's Energy dashboard, not on this live card. Total grid input energy and Total grid output energy are the battery's own charge and discharge totals. On Venus A and Venus D, Total solar energy is the solar total. Adding solar and the battery totals together can count the same solar twice. Energy dashboard shows which row each sensor belongs on.
Battery health card
The health card is already registered. Search for Marstek in Add card and pick Marstek battery health for one battery, or Marstek battery fleet when you want every battery on one scale.
If you edit YAML, add the card in the visual editor first and then open the code editor. Home Assistant fills in device_id. That value is the device registry id, not the MAC and not the entity id.
type: custom:marstek-battery-health-card
device_id: YOUR_DEVICE_ID
show_tabs: true
default_tab: capacity
default_tab is one of capacity, runs, energy, restarts, or corrections. The fleet card is custom:marstek-battery-fleet-card and needs no device id.
A sections view on a phone
Paste this as a view in the raw configuration editor when the dashboard uses sections. On a narrow screen the section becomes one column. On a wide screen the gauge and the power tile sit side by side.
type: sections
max_columns: 2
sections:
  - type: grid
    cards:
      - type: gauge
        entity: sensor.<battery>_battery_level
        name: Battery level
        min: 0
        max: 100
      - type: tile
        entity: sensor.<battery>_battery_power
        name: Power
        features:
          - type: trend-graph
            hours_to_show: 12
      - type: tile
        entity: select.<battery>_operating_mode
        name: Mode
  - type: grid
    cards:
      - type: entities
        title: Battery
        entities:
          - entity: sensor.<battery>_battery_status
            name: Status
          - entity: sensor.<battery>_on_grid_power
            name: On-grid
          - entity: sensor.<battery>_off_grid_power
            name: Off-grid
          - entity: sensor.<battery>_battery_state_of_health
            name: State of health
      - type: history-graph
        title: Power
        hours_to_show: 12
        entities:
          - entity: sensor.<battery>_battery_power
            name: Power
          - entity: sensor.<battery>_on_grid_power
            name: On-grid
On Venus A or Venus D, add a tile for sensor.<battery>_pv_power in the first section and add that same entity to the history graph.